Step-By-Step Professional Guide On How To Apply Eyeshadow
- Category: Makeup, Makeup Tutorials, Tips & Tutorials
- Reply to post
Eye makeup can take your makeup game to another level. ItŌĆÖs either make it or break it when it comes to eye makeup, really. Things can go horribly wrong. If you try and attempt things that you arenŌĆÖt too sure of, you might have yourself ready for a halloween party, rather than for work. Worry not! We have devised a foolproof guide in order to perfect eye makeup, so letŌĆÖs dive right in!
Before we can start talking about the eye shadow, we need to look at the various products required to get the perfect eye makeup.
You Will Need
- Moisturizer
- Eye cream
- Eye primer
- Eyeshadows
- Eye makeup brushes
- A kohl pencil
- An eyeliner
- A mascara
Now, letŌĆÖs look at some of the types of brushes that weŌĆÖll be using throughout this tutorial.
Types of Brushes
Different brushes have different functions. One would be useful for packing on the eyeshadow, the other for blending and another for smoking out the lower lash line. LetŌĆÖs look at a few of them.
Flat Stiff Brush
This brush can be used for applying eyeshadow on the eyelid, as well as under the lower lash line. A flat brush is best for packing the product onto the eyelid. The MAC 239 is a great product for this. This also works extremely well when you want to apply a glitter pigment as the stiff nature of the brush helps in picking up the product easily.
Pencil Brush
The pencil brush is used to apply the product onto the lower lash line. This is great for when youŌĆÖre smoking out the lower lash line, or if you want to create a soft look. You can also use this at the crease to create a soft crease line. It works well at the outer corners of the eye where you want to add intensity as well.
Stiff Dome Brush
This brush is perfect for applying and blending out colors. ItŌĆÖs especially useful when you are using more than one color and want to create a smooth transition without removing the shade differences.
Fluffy Dome Brush
The fluffy dome brush is for blending, blending, and then ŌĆō you guessed it right ŌĆō blending some more. It helps you achieve that flawless eyeshadow transition from one shade to the other. It helps to diffuse any harsh lines and makes the transition look smooth.
Pickles: You either loved them or hate them! But there are many benefits of this fermented food. Find out what nutrients you can get from this food and other ones.
Okay, now that you know about what the various brushes do, get them ready! ItŌĆÖs time for the eyeshadow tutorial!
How To Apply Eyeshadow ŌĆō Step-By-Step Tutorial
Step 1: ItŌĆÖs All About That Base
Prepping the eye area is extremely crucial since itŌĆÖs all about that base (Meghan Trainor might be talking about a different kind of base, but sheŌĆÖs not wrong!). Start by cleaning the area around the eyes. Follow it up with a moisturizer or an eye cream. Next, prep the eye area with an eye primer so that the makeup stays put for a longer time and gives a seamless finish. You can also use a concealer that matches the skin tone around your eyes. Apply the concealer with a brush and seal it with a translucent or transparent powder. This will make the eye area look even, make the skin crease-proof, and also conceal any discoloration of the skin. It also creates a clean base so that the colors sit better.
Step 2: Chose The Type of Eyeshadow
ItŌĆÖs now time for the actual eye makeup. You should always analyze the shape of your eyes and accordingly decide on a makeup technique that will enhance them. The eye area consists of the eyelid, the crease, and the brow bone. ItŌĆÖs also important that you know which shade or texture to use on each of these areas. Use textures like frost/shimmer/shine on the eyelid and brow bone, and matte finish textures on the crease.
Pro Tip ŌĆō Use darker shades of eyeshadows to contour the eyes at the crease and use lighter shades at the center of the eyelids to make the eyes pop.
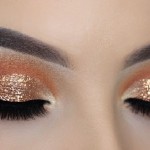
Start by applying the color on the eyelid with a flat eyeshadow brush using a sweeping or patting motion. Here, a dull gold shade in frost texture was used, since there is very less lid space. This lighter shade will make the eyelid more prominent. Start the application from the center and then sweep it towards both inner and outer corners. Apply the color evenly on the lid and deposit more for intensity.
Step 3: Dark Shades for the Crease
Now, we concentrate on the crease area. Use a darker shade of eyeshadow to define the eye shape. To achieve this, go for shades like deep browns, black, deep gray, dark purple, etc. Start applying from the outer corner of the eye, making a ŌĆśVŌĆÖ, and blend it halfway through the eyelid with a fluffy eyeshadow blending brush. Do this using the windshield wiper motion. Keep blending until the color starts to look softer. In order to highlight the brow bone, go for lighter shades in either frost or shimmer textures.
Step 4: Rim The Eyes With Kohl
To make the eye makeup more dramatic, use a kohl pencil on the lower lash line. Smudge it with a smudger/pencil brush if you want a smokey effect.
Pro Tip ŌĆō Using a white/beige colored eye pencil on the lower rims of the eyes is the best way to make them look bigger and brighter.
Step 5
Apply eyeliner to define the eyes. Start from the outer corner and gradually pull it inwards using small strokes. You can keep it simple, or make it dramatic. And, when in doubt, just wing it out!
Afraid That Your Eye Makeup Will Crease?
How To Apply Eyeshadow
In order to prevent your eye makeup from creasing and smudging, you can follow these tips.
- Invest in a good base or primer as it will instantly boost your eye makeup and will make the eyeshadow stay put for a long time.
- Make sure to set the eyeshadow with a powder base if youŌĆÖve used a cream-based eyeshadow.
- Use a gel or waterproof eyeliner to prevent any transferring of the product.
Some Quick Tips to Apply Eyeshadow Perfectly
- ItŌĆÖs always good to finish your eye makeup first and then move on to your base makeup. That way, if thereŌĆÖs an eyeshadow fallout under or around the eyes, you can quickly clean it up without spoiling your base makeup.
- To define the crease area, use a pencil brush and then blend it with a fluffy brush.
- Choose a formula that works best for you. TheyŌĆÖre available in either cream, powder, or pressed form. Cream eyeshadows can be used as a base for powder eyeshadows.
- In case you have hooded or deep set eyes, try applying the eye makeup with your eyes open instead of closed so that the crease color is actually visible.
- If you have trouble drawing the ŌĆśVŌĆÖ on the outer corner of the eyes, then draw a ŌĆś#ŌĆÖ with an eye pencil and blend it immediately to avoid stark edges.
- To avoid eyeshadow fall out, powder the area under your eyes with a transparent or translucent powder before beginning the eye makeup. Once you are done, just sweep the powder off.
- You can also wait to conceal your under eyes till after the eye makeup.
- Make sure to use clean brushes as this will give you the best transition.
Applying eyeshadow perfectly takes a little time and patience, but once youŌĆÖve got it down, it becomes very easy. I canŌĆÖt believe there was a time when I was intimidated! Now, I look forward to the days when I have to attend a party or a wedding so that I can go all out with my eye makeup! If you have any queries, just comment in the box below.
ExpertŌĆÖs Answers for Readers Questions
- What color eyeshadow is to be used for blue eyes?
- It is better to use neutral soft tones like coral and champagne for blue eyes. Avoid anything too dark like a black smokey.
- What color eyeshadow is to be used for brown eyes?
- Neutral shades like copper and bronze accentuate the brown color in your eyes. Try adding a bit of a dark shade in the crease to deepen the look and add intensity.
- What color eyeshadow is to be used for hazel eyes?
- Opt for the metallics, pastels and dusty pinks.
- What are the best eyeshadows for mature eyes?
- When dealing with mature eyes, it is best to use shades that make your eyes look brighter. Using too many dark colors will make you look tired. Opt for light shimmer shades.

Related posts
 How to Put Eyeshadow Perfectly – A step by step tutorial
 How to apply fantasy eye makeup
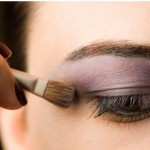 How to Apply Eye Makeup
 How to Get Dramatic Eyes in Five Fast Steps
 Lipstick Shades: A BeginnerŌĆÖs Guide For Every Skintone
 How to Apply Fake Eyelashes Fast & Easy
 20 Makeup Hacks Every Busy Girl Needs To Know
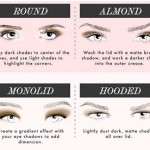 How To Contour Your Eyes Based On Eye Shape
 Mastering the Art on How to Apply Mascara to Lower Eye Lashes
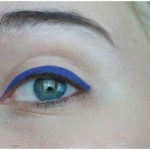 Hooded Eye Makeup Tutorial – Eyeshadow & Eyeliner Tips