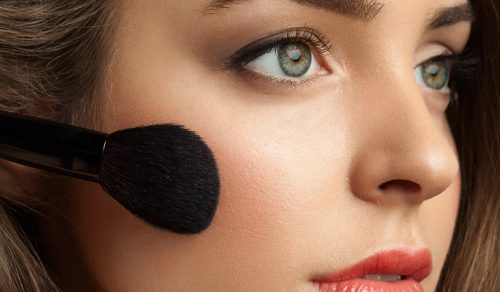
How To Apply Blush To Get A Natural Look
- Category: Makeup, Makeup Tutorials, Tips & Tutorials
- Reply to post
Foundation plays a vital role in beautifying the complexion. Base makeup can conceal skin flaws such as open pores or dark spots. Yet the coverage effect of makeup can mask the natural complexion and expression. A blush comes in handy to restore a healthy glow. A few dabs of color to the cheeks accentuate the natural tone of the complexion and bring out a transparent clarity and natural flush that seems to glow from within. Blush also adds dimension to the face. Depending on how it’s applied, it can sharpen facial contours or conjure a cute and charming impression.
How To Apply Blush To Get A Natural Look
Preparation
- Choose your blush type. Powder and gel blushes are good for oily skin; cream is best for normal to dry skin. Whichever type you choose, its shade should match your natural coloring, so try to pick one that reflects your colour when you blush normally
- Select a color that will accent your existing best facial features and that won’t stand out too much. Bright red may not look great on a pale person but can be terrific on a bronzed brown skin tone.
- If you’re pale, try a soft pink color or maybe even something with a little tan and pink in it.
- Depending on your skin tone, you might need a lighter or a darker color. Dark skin needs a lighter color, whereas light skin may need a more natural color such as brown or tan.
- It is suggested that to select the right color of blush, make a fist for about ten seconds, and the resulting color on your fingers is the color that you want to match.
- Purchase some quality blush brushes. A blush brush is the best choice; never use a small, cheap brush. If you use a cheap brush, you’ll have a cheap looking result. Avoid makeshift items such as cotton wool balls or powder puffs as these do not work well with the pigment in the blush.
- 3. Provide for a well lit space when adding your blush. Consider obtaining a lighted makeup mirror which will help emphasize your features and clarify what you are doing. Prepare prior to doing your makeup by washing your face, brushing your teeth, and putting on any foundation, cover-up, and bronzer that you regularly use.
Application:
- Apply blush once you’ve applied all your other makeup.
- Prepare. If you’re using a powder, lightly sweep a medium-sized fluffy brush through the blush and then tap it to remove any excess. If you’re using a cream or gel, dab a little on your ring finger.
- Start with just a little blush — it’s easier to add more to your face than to take off too much of it.
- Do a fish face, and apply the blush. This help you find the apple of your cheeks. Don’t smile, that bring your cheeks up, and can make your blush too low.
- The apples are the round rises where you naturally blush.
- Apply the blush to the center of the apple on one side of your face, blending the color along your cheekbone. If you’re using a cream or gel, dot the color first, then use your finger or a makeup sponge to blend it in. For the most natural look, always concentrate the color on the apples of your cheeks and blend well. And before blending, always dust off the excess to avoid excessively rosy cheeks.
- Make strokes with the brush from your cheeks (towards your nose) to the side of your face (towards your ears). Try not to make diagonal lines, as these won’t appear natural but will risk being clown-like. Excess product can be blended toward the ear from the middle of the eye.
- Use a clean brush for blending.
- Brush downward at the end of blending, to allow the facial hairs to lie smoothly on your skin’s surface.
- For a more youthful look, make sure to apply the blush on each side no lower than your nostril and no closer to your nose than your pupil.
- If you accidentally apply too much powdered blush, cover it with translucent powder to tame the color. Excess cream can be blotted with a tissue. If you overdo it with a gel, wash it off and reapply sparingly.
- Repeat on your other cheek, taking care to match the placement and color of the blush on both cheeks. Aim for symmetry.
- Dust your face with a translucent powder to set your new look. The translucent powder brings inner warmth into the cheeks.
8.Finished.
Blend light dabs of color in wide, circular sweeping motions along the cheekbones
Blushes come as powders, creams, or liquids. The powders are the easiest to use, especially with professional blush brushes. Brushes with abundant soft bristles hold plenty of powder for rendering natural gradations and finish. Start by putting ample blush powder on the brush, tapping off any excess powder over a tissue or the palm of your hand. Next, apply a light dab of color in wide, circular sweeping long along the lines of the cheekbones to create a soft effect without conspicuous borders.
This will bring out a natural healthy, flushed look. For a more chiseled appearance, blend on the powder blush at a sharper angle of the brush along the cheek lines. Never apply the blush below the nose line, as this may create a droopy-cheeked effect and makes you look old. If you have high, prominent cheek bones, apply light colors in wide generous, circular strokes to soften the cheeks. Strong colors can easily draw too much attention to the checks by emphasizing their height and volume. Avoid too reddish colors and let the powder blend naturally into the skin.
Be sure to apply the blush symmetrically. Blend on the blush in the same way and direction on each side of the face and double check that the darkest parts of the cheeks match perfectly on the right and left.
How do professional makeup artists prevent harsh lines?
A broad-tipped blush brush won’t leave harsh lines. For the best effect, the brush tip should follow the handle as you apply the blush on your cheeks.
Selecting the right blush texture:
glow vs. matte
Finishes of many types, from matte to glow, are available for different looks and preferences. Glowing, radiant textures bring out a firm, youthful look and are very popular at the moment. However, make sure that you choose a texture that gives you the desired finish. Young women prone to crumbling makeup may want to select a matte blush to avoid too much shininess.
Mature women are well advised to go for a matte type or a natural glowing texture with fine granules rather than a blush with strong luster. If you want to hold back on the pearly effect but seek something more sheer than matte, you may like the foggy, velvety-like quality of the semi-matte type.
A sampling of finishing effects (textures)
- Glow: Youthful, healthy, clear and transparent
- Semi-matte: Soft and light, foggy
- Matte: Refined, delicate, fashionable
Blush techniques with sophistication
Blush improves the skin color while adding contours to the face. If you want to downplay the skin color difference between your face and neck, you can blend some leftover blush powder upwards from the bottom of the chin after doing your cheeks. If you want to soften the contours of your nose, add a touch of color at the bridge of the nose. If you’re more concerned about dullness around the lips or flakiness in your foundation, obscure the problem by gently brushing touches of red from beneath the nose down to the upper lip.
Selecting the blush color
Select a blush color according to your preferred look. If you want a color that blends well with your skin, select pink for a fair skin color, coral or red for a medium skin color, or orange or beige for darker skin. If you want to try on other blush colors, stay safe by combing them with other makeup colors that blend naturally with your skin.
For a makeup look with a sense of unity, try matching the colors of your cheek blush and lip color. When you wear a bright red lipstick, for example, a light dab of red blush will obscure any hints of white flakiness of your foundation.
Makeup is a creative medium for expressing a woman’s individuality. By coordinating the color of your eye and lip makeup with your cheek blush, you’ll soon be able to use a whole range of colors you could never use before.

Related posts
 11 Steps Guide On How to Apply Makeup for a Night Out
 Basic Steps for Sexy Eyes
 How to Apply Makeup for a Party or Night Out
 How to Hide Under Eye Dark Circles with Makeup
 How to Wear Neon Blue Eyeshdow
 How to Apply Party Makeup Step by Step
 7 Highlighting Guidelines for the Perfect Glow
 Spring Makeup Tutorials Beauty Tips & Tricks
 How To Apply Liquid Eyeliner
 Step By Step: How to Hide Acne With Makeup