Simple Side Braided Hairstyle
- Category: Hair
- Reply to post
Most regular braids can be worked to the side to create an elegant variation. Side braids can be worn on their own, added to an overall style, or pinned to create an updo. These braids may take some practice to master but once you get the hang of them, you’ll discover how much fun they are to wear.
French Side Braid
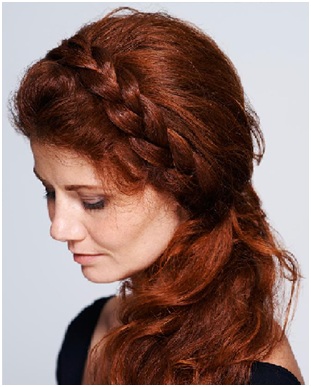
This is a variation of a typical French braid. This look is quite popular since the release of the movie Frozen as it resembles the hairstyle worn by Elsa. To get this look:
- 1. Start by teasing a section from the top of the head to the crown area to get the volume where you want it. Make sure not to tease the outer section as this will cover up the teased hair to make it look smooth.
- 2. Start the braid just below the crown. Do this by taking the hair in a section from the front hairline just above the temples on each side of the head and pulling back to the lower part of the crown.
- 3. Divide that section of hair into three pieces.
- 4. Cross the pieces in this manner: left over center, right over center.
- 5. Pick up a small section of hair from the temples on both sides and add to the pieces that you are holding on those sides. Begin working the braid slightly to the left.
- 6. Cross the pieces the same as before: left over center, right over center.
- 7. Continue this pattern of picking up small sections of hair, adding them, and crossing them until you run out of hair to add. With each addition, work the braid more to the left. When you run out of hair to add, the braid should be just behind the left ear
- 8. From that point, simply cross the pieces in a regular braid to the ends.
- 9. Fasten off the ends.
- 10. With either your fingers or the tip of a rattail comb, loosen the braid all the way through. Don’t loosen it enough to pull it out, but just enough to make it look very full.
- 11. Smooth down any stray pieces of hair with hairspray and a comb.
French to Fishtail
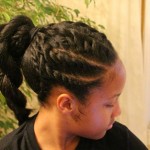
This style, while very cute on young girls, is not limited to the younger set. The side braids are French braids that join into a fishtail braid at the back. While this braid looks difficult, it is really quite easy to achieve.
- 1. Start by parting the hair down the center of the head to the occipital bone. This is the curve in the back of the head. Secure one side with a clip to keep it out of the way while you braid the other.
- 2. Take a small section of hair at the front hairline, and section it into three pieces.
- 3. Cross the pieces in this manner: left over center, right over center.
- 4. Pick up another small section of hair and add to the pieces that you are holding on the sides.
- 5. Cross the pieces the same way: left over center, right over center.
- 6. Continue this pattern of picking up small sections of hair, adding them, and crossing them until you reach the occipital bone. Secure the braid with a clip.
- 7. Move to the other side of the head and repeat the above braiding process.
- 8. Beginning the fishtail braid can be tricky. For this reason, move the clips up just above the end of the French braids so that they do not come undone.
- 9. Holding all the remaining hair in your hands, make sure it is free of tangles by running your fingers through it. Divide this hair into two sections.
- 10. Starting on the outer side of the left section, take a very small piece of hair and cross it over to the inside of the right section. Pull snugly to keep the tension on the braid.
- 11. On the outer side of the right section, take a very small piece of hair and cross it over to the inside of the left section. Pull snugly.
- 12. Continue this pattern until you reach the ends of the hair.
- 13. Fasten the ends with an elastic band. Remove the clips from the French braids.
Side Braid Band
This is a very easy and pretty braid. It can be finished with either a ponytail, as shown here, or with a bun.
- 1. Start by making a deep side part on one side of the head. Here it is shown parted on the right and braided to the left.
- 2. About three fingers width from the hairline, take a section of hair that is about two inches wide by one inch thick. Brush this section free of tangles.
- 3. Starting at the root area, make a simple braid of this section by dividing it into three pieces and crossing in the following pattern to the ends: left over center, right over center. Fasten the ends with an elastic band.
- 4. Gather the remaining hair at the nape area on the left side of the head, just behind the ear.
- 5. Bring the braid into this hair by placing it over the top like a headband.
- 6. If you are wearing a ponytail, as shown, fasten hair with an elastic band. (If you are wearing a bun, twist the hair into your preferred bun shape and secure, skipping step seven.)
- 7. Remove the elastic band from the braid ends and brush so they become part of the ponytail.
Snail Braid
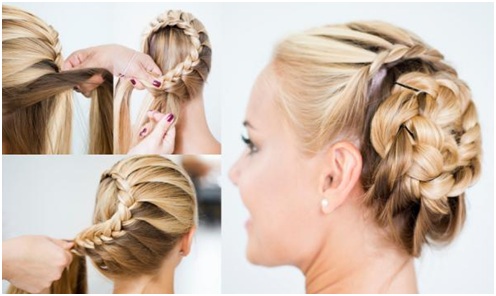
This is a unique, one-sided French braid that is perfect for a formal occasion. It’s a tricky one to complete but the results are lovely.
- 1. Starting at the top of the ear, make a large circular sectioning. You will only be adding from the outer section.
- 2. Take a small section at the top of the ear to begin the braid. This can be a bit awkward since the braid starts going up the head. Divide this section into three pieces.
- 3. Cross the pieces in this manner: left over center, right over center.
- 4. Pick up another small section of hair from the top of the head and add to the piece that is in your right hand. Do not pick any hair up from the lower section.
- 5. Cross the pieces the same way as before: left over center, right over center.
- 6. Continue this pattern of picking up small sections of hair, adding them, and crossing them while working in a large circle until you reach the opposite side of the head.
- 7. At this point, the hair that is hanging down will slowly be incorporated with the outer layer of hair being picked up and worked into the braid. Continue this pattern of picking up small sections of hair, adding them, and crossing them until you reach the hairline just behind the ear.
- 8. Continue the pattern of crossing sections in a regular braid to the ends of the hair. Fasten with an elastic band.
- 9. Wrap the braid in a spiral in the center of the French braid.
- 10. Tuck the end of the braid underneath to hide it and secure with bobby pins.
Headband With a Bow
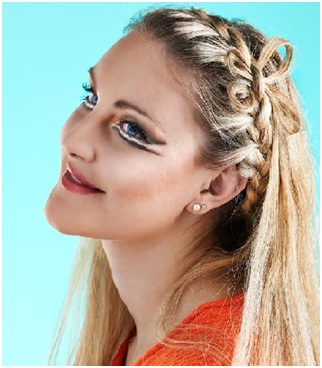
This beautiful braid is not as daunting as it looks. If you can French braid you can do this braid.
- 1. Start by parting the hair from just behind the ear to just behind the opposite ear. Secure the back of the hair with a ponytail holder or clip to keep it out of your way.
- 2. Take a small section of hair and section it into three pieces.
- 3. Cross the pieces in this manner: left over center, right over center.
- 4. Pick up another small piece of hair from the front and the back of the braid and add to the pieces that you are holding on the sides. Take more from the front and less from the back to keep the braid back from your face.
- 5. Continue this pattern of picking up small sections of hair, adding them, and crossing them until you reach the hairline just behind the ear. From this point, finish crossing the pieces in a regular braid to the ends.
- 6. Fasten the ends with an elastic band. Tuck the end of the braid under the back of your hair and secure with bobby pins.
- 7. Take the remaining hair down and make a thin section of hair just behind the braid.
8. Using a hair pin, place it through the back piece of the braid where you want the top of the bow. - 9. Pick up a very small piece of hair at the hair pin from the section you just made behind the braid. Make a loop in this piece of hair, and feed it through the braid using the hair pin.
- 10. Remove the pin and straighten the bow.
- 11. Repeat steps 7-10 in the same back piece of the braid for the lower part of the bow.
- 12. Leave the remaining hair down and let it fall loose over the back of your head.
Dutch Five-Strand Braid
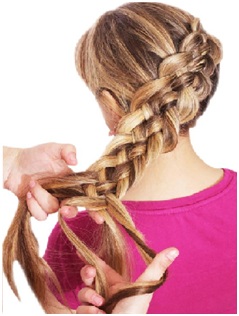
This is a tricky braid to complete until you get used to doing it. As with any braided styles, the more you practice the better you will get at it.
- 1. Start by sectioning the hair just above the ear into three sections and cross it as you would start a French braid. This braid will be worked diagonally across the head.
- 2. Pick up a small section of hair on each side of the braid. Do not add them into the side pieces like a French braid. These two sections become your fourth and fifth pieces of hair in the braid.
- 3. If you started the first stitch of the braid on the left, you will start braiding the five pieces from the left side first. To do this, take the far left piece that you just picked up and cross it over the piece next to it, and under the center piece.
- 4. Now, from the far right piece, work the same pattern: over the piece next to it and under the center.
- 5. Just as with a French braid, pick up a small section of hair on both sides of the braid and add to the outer pieces on both sides.
- 6. Work the same pattern from the outer left piece: over the piece next to it and under the center.
- 7. Work the same pattern from the outer right piece: over the piece next to it and under the center.
- 8. Pick up another small section of hair on both sides of the braid and add to the outer pieces on both sides.
- 9. Continue this pattern until you run out of hair to add.
- 10. At this point, finish the braiding pattern until you reach the ends of the hair.
11. Fasten the ends with an elastic band. - 12. Gently pull the outer edges of the braid to fan the braid. This will make the detail easier to see as well as hide any gaps along the way.
- 13. Drape the freely hanging braid across the front of the shoulder.
Practice Makes Perfect
Braiding is a pattern of weaving hair over and under. Whether you are a beginner at braiding or have been doing it for years, it is common to feel like you are getting tied up in the hair. While there is no real fix for this aside from practice, hand stretches can help with dexterity. Practice these braids on yourself or your friends so you can feel confident in your hair weaving skills.
