How to Do a Fishtail Braid
- Category: Hair
- Reply to post
The fishtail braid looks rather complicated to a beginner, but it is much easier than the basic braid or the French braid. This braid can be taken from simple to dramatic with just a few tugs while braiding. The smaller the sections that you take while braiding, the more detailed the finished braid will look.
How to Do a Fishtail Braid
Prepping Hair for a Braid
Second-day hair (hair that was washed the previous day) is best for braiding. Braids can be done on freshly washed hair, but without product in it the hair is too slick. If you do plan on braiding freshly washed hair, use a lightweight or flexible hold hairspray or styling spray such as Paul Mitchell Super Clean Spray. The styling spray gives the hair some grip so that it is easier to braid. Spray the hair while lifting to ensure most of the hair has product on it.
Braiding a Fishtail
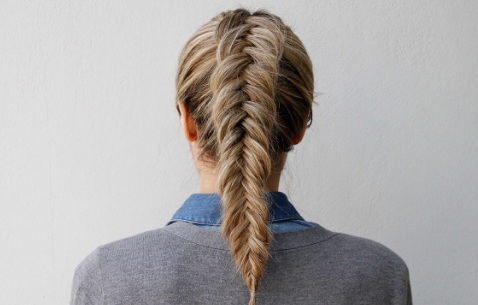
The basic braiding process is the same regardless of where it is started on the head. The image above shows a ponytail that is a fishtail braid. Follow these simple instructions to achieve this look:
- 1. Brush hair free of tangles. Gather into a ponytail at the occipital bone (the curve at the back of the head) and fasten with an elastic band.
- 2. Brush the ponytail and separate it into two sections.
- 3. It does not matter which side you start the braiding on as long as you keep the pattern the same all the way through. For instructional purposes, start on the left section.
- 4. Take a small piece of hair from the outside of the left section. This is easily done by poking your index finger through the left section of hair to make a clean separation. Cross the piece over the left section and join it to the right section.
- 5. Take a small piece of hair from the outside of the right section using your index finger as before. Cross this piece of hair over the right section and join it to the left section.
- 6. Repeat this pattern to just above the ends of the hair. Fasten with a small elastic band.
Basic French Fishtail
A French fishtail braid is done by combining the technique for a basic French braid with that of the basic fishtail braid. It looks complicated but you’ll soon find that it really is not. If you can do a basic French braid with three sections of hair, you can do a French fishtail braid. The following video shows how this braid is done.
Wrapped French Fishtail
The wrapped French fishtail is a variation on the basic French fishtail shown above. This style can be close to your head or have lots of volume as shown in the image at right. From the part of the hair to the point that you run out of hair to add behind the opposite ear, it is worked as a French fishtail braid.

Start by making a deep side part on either side of the head. Here it is shown on the right side. Brush the hair free of tangles.
- 1. Pick up a small section of hair at the part a couple of inches off the front hairline. Divide this hair into two sections.
- 2. At this point you need to decide if you want the braid to be visible or invisible. If you want the braid along the head to be visible, cross the pieces over the top. If you want the braid to be invisible like most basic French braids, cross the hair underneath the sections.
- 3. Start braiding as a normal fishtail taking a small piece from the outside of the left section and crossing it to the right section. Then repeat from the right section to the left section.
- 4. At this point, begin adding small sections of hair from either side of the braid to the small pieces that are picked up from the outside of each section. Cross the left to the right and right to the left.
- 5. After you have worked the braid to the temple area of the opposite side of the head, gently tug the braid outward working up to the start of the braid. This adds volume to the braid as shown in the picture.
- 6. Continue with the French fishtail, starting to wrap the braid to the back of the head.
- 7. When you reach the nape area, go back and gently tug the braid outward to add the same volume as the top of the braid.
- 8. By the time you get to the nape area, you should have run out of hair to add to the braid. Now, the braiding process becomes that of the basic fishtail braid. Take a small section from the outside of the left side and cross to the right. Then repeat from the right section to the left.
- 9. Continue braiding to just above the ends of the hair. At this point, you can tug on the braid to add volume if it is desired. Then, fasten the ends with a small elastic band.
Video Tutorial:
Side Fishtail
This braid can be worked the same way on either side of the head. Here it is shown braided on the right side. If you choose to braid it on the left side, simply switch the side you begin on, as this braid is started from the inner section of hair. Once you have decided which side to wear the braid on, follow these simple instructions to achieve this look.
Brush the hair free of tangles and gather it all to the right side.
- 1. Making sure to get all of your hair, divide the hair into two sections.
- 2. Starting the braid at the ear or just below, take a small piece of hair from the outside of the left section with your index finger. Cross this piece over to the right section.
- 3. Pick up a small piece of hair from the outside of the right section with your index finger. Cross this over to the left side.
- 4. Continue this pattern until just above the ends of the hair. Fasten with a small elastic band.
Finishing the Style
To tame flyaway hairs, use a light mist of hairspray after the braid is finished. If you want a more polished look you can stop the braid about three inches above the ends. Fasten the ends with a small elastic band, then take a small piece of hair from underneath and wrap it around the braid to hide the elastic band. Fasten the ends at the back of the braid with a small bobby pin. You could also attach a beaded ponytail holder to the ends for a fun finish. For an elegant wedding style, add fresh flowers such as baby’s breath through the braid.

Related posts
 Hair Tutorial: Easy Braided Updo Hairstyle
 How to Grow Your Hair Long
 How to Make a Waterfall Braid
 How to Style a Pixie Cut
 Simple Side Braided Hairstyle
 How to French Braid Hair
- How to Create French Braids
 Instructions for braiding hair in cornrows
 Easy Ways to Accessorize Ponytail Styles
 How To French Twist Hair